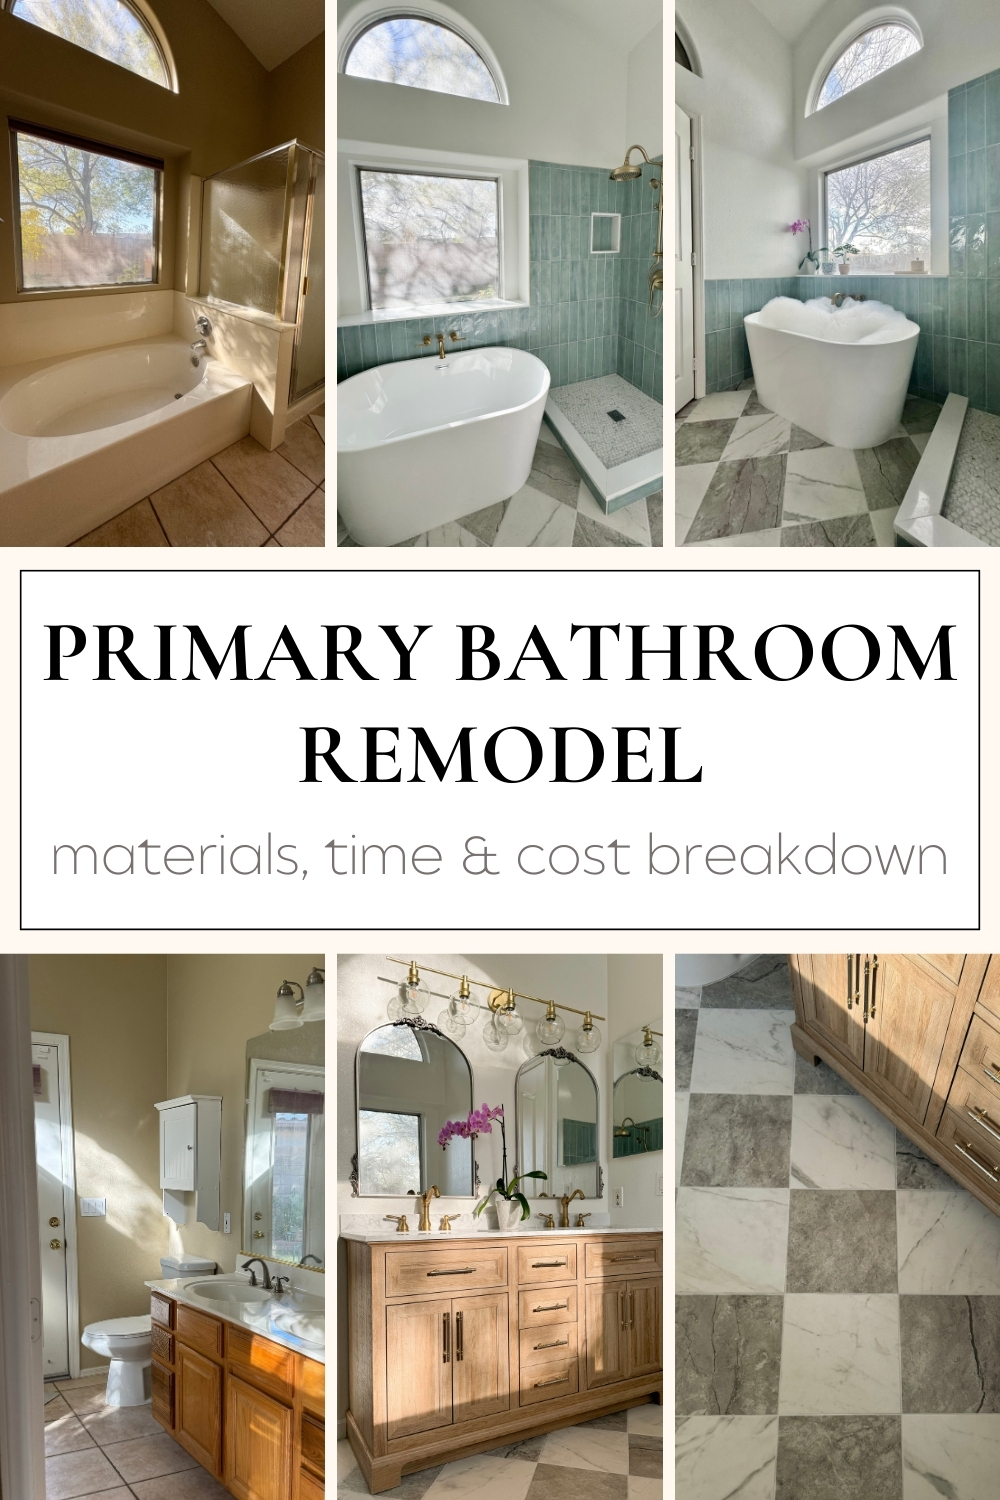
Primary Bathroom Remodel Reveal – from outdated beige to beautiful blue
This may just be my favorite home post yet… Our Primary Bathroom Remodel Reveal!
We purchased our home in 2020 knowing we would be slowly be updating pretty much everything. The home itself is beautiful! However, the interior consisted of mostly 1990s original worn down fixtures with a sprinkle of the 2000s faux tuscan era.
From DIY to using professional help, we’ve tackled a little more than half of our home.
So far in our 90s home, we have done the following large projects:
- replaced all carpet with wood look luxury vinyl planks (these exact luxury vinyl planks).
- painted our tile fireplace (read about our fireplace makeover)
- partial remodel to our hallway bathroom (our hallway bathroom makeover)
- replaced kitchen countertops, added backsplash and stained our OG 90’s oak cabinets in our kitchen (a sneak peak here)
- Painted the entire interior with “Pure White” by Sherwin Williams.
- and Now updated our Primary bathroom!
Primary Bathroom Remodel Reveal – from outdated beige to beautiful blue
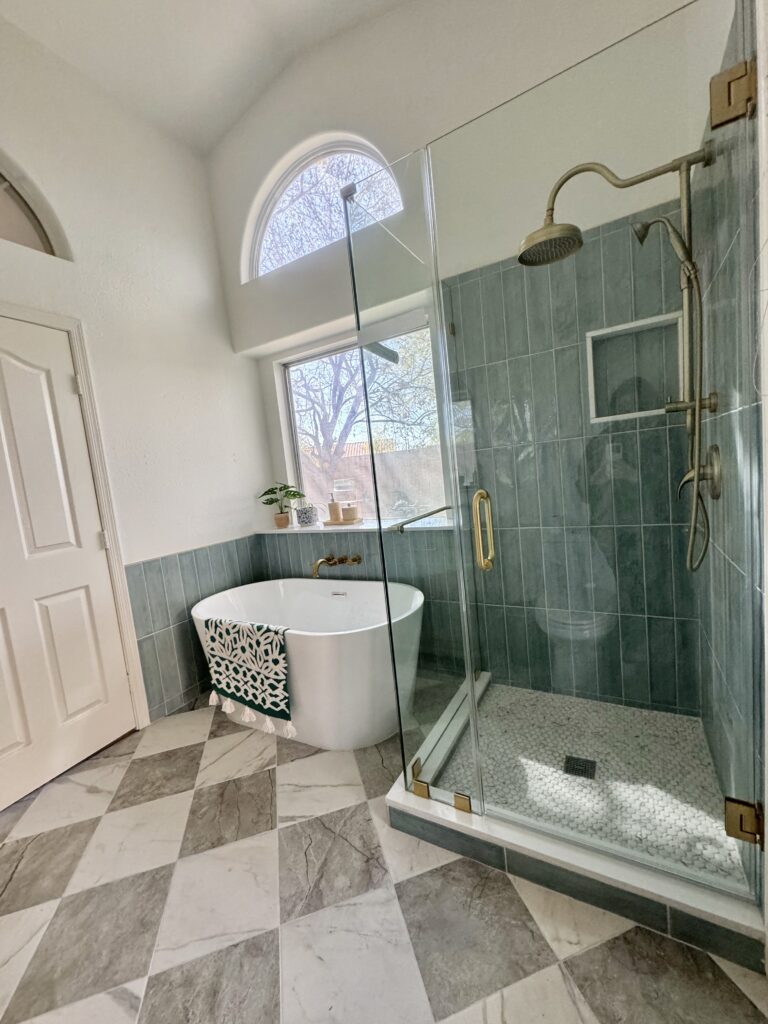
It’s amazing what a new color scheme can do to the overall aura of a space!
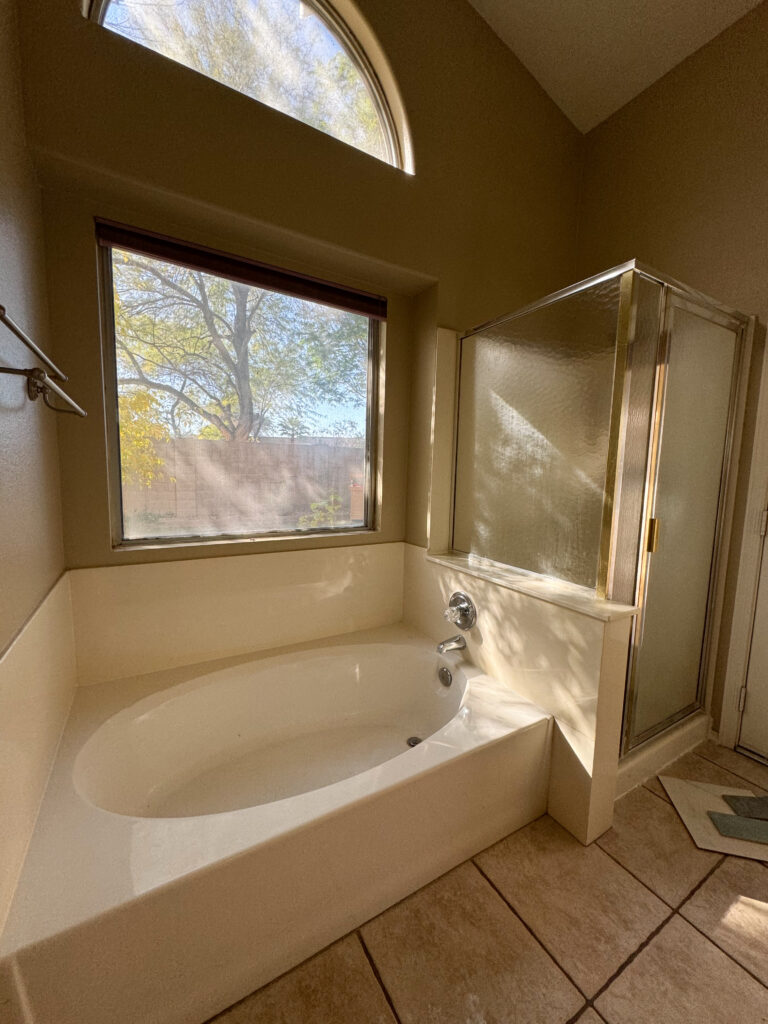
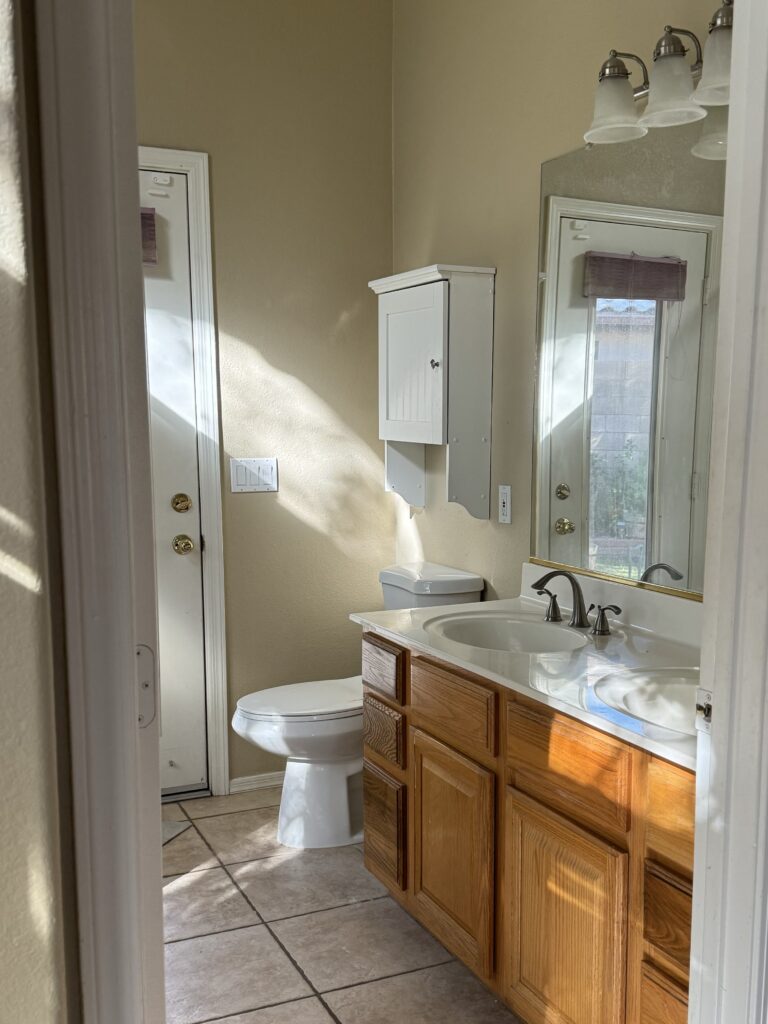
Before the remodel, our primary bathroom was my least favorite part of the house. It always felt dingy, sad and dirty no matter how much sun came through or how much I cleaned and scrubbed the space.
To my defense, there was over 20 years worth of calcium build up on the original shower glass that I just couldn’t tackle.
Primary Bathroom Remodel Turnaround Time
This bathroom remodel project took about 2.5 weeks total to complete from demo to what is pictured above. Our shower glass had to be sized and cut, so it will be another 2-3 weeks for that to be installed.
Checkerboard Bathroom Tile
Checkerboard Bathroom Floor Materials
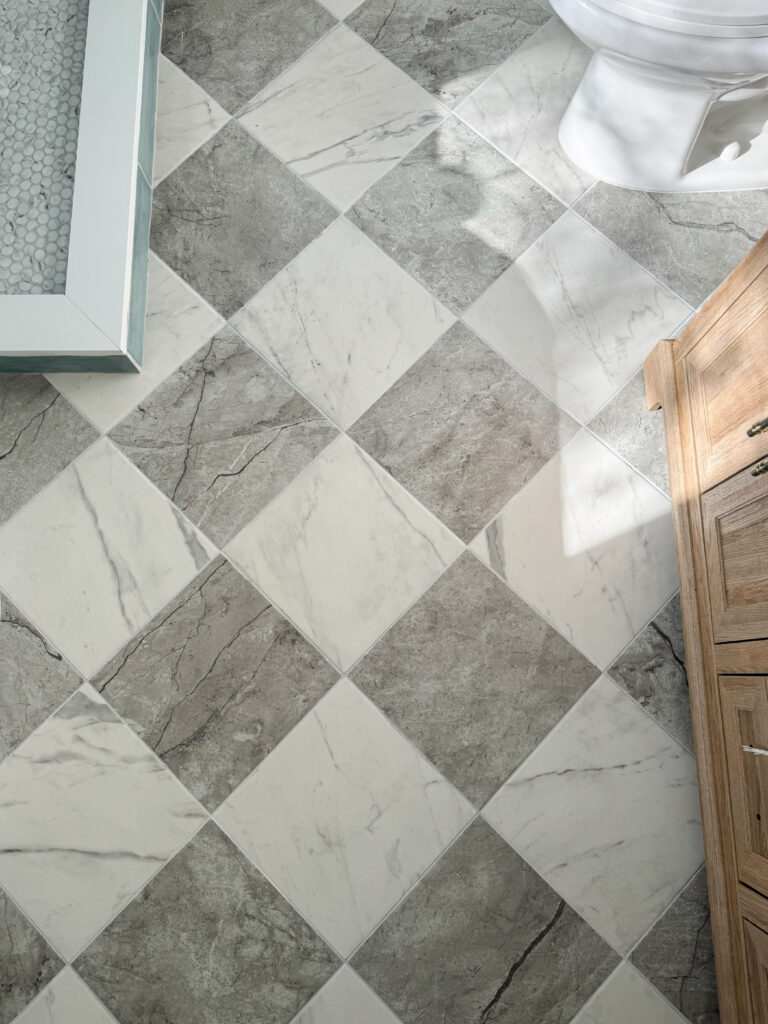
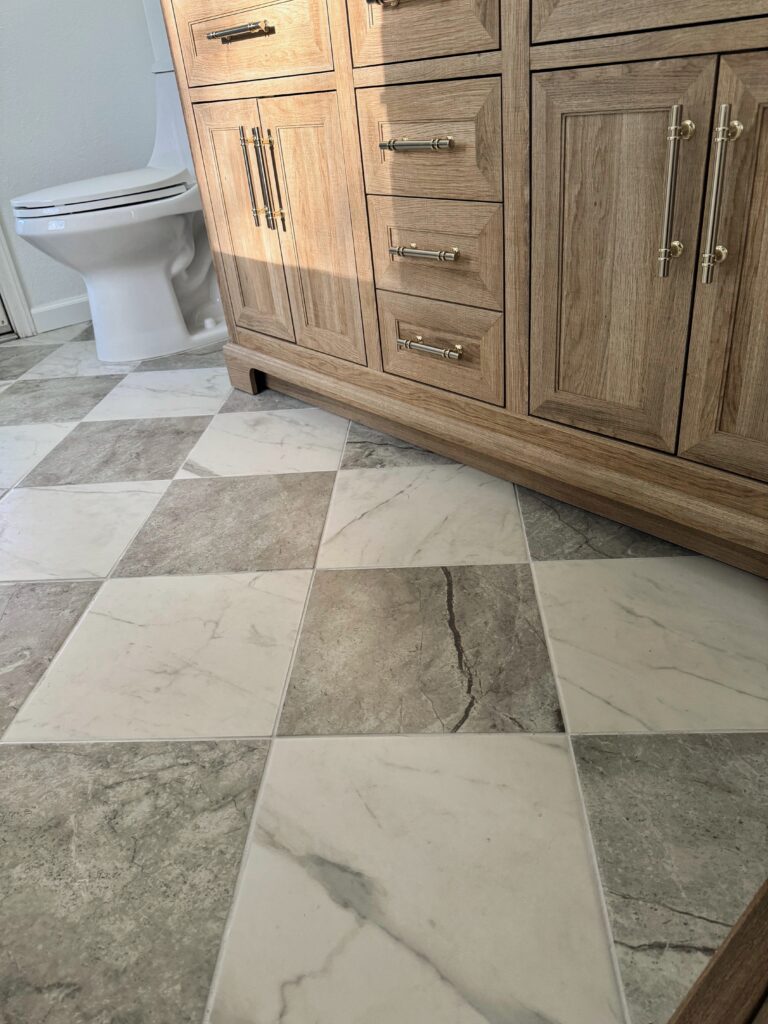
- Grey Floor Tile (12.99” x 12.99” & 7.5mm thickness)
- White Floor Tile (12.99” x 12.99” & 7.5mm thickness)
- Grout color: “silver shadow”
- 1/8 Grout Spacers
Speaking of checkerboard flooring…
My number one must have for this bathroom was diamond checkered flooring. No, not the most important element to a bathroom, but I mean… the vibes!
As classic as checkerboard flooring is, it was SO difficult to find two contrasting tiles that were compatible with one another, affordable AND actually in stock.
Tips for finding tile to create the checkerboard floor look:
- both tile colors must be the exact same size & tile thickness (down to the millimeter)
- both tiles should have the same finish (matte, satin, polished)
- both tiles will need the same edge cut on all 4 sides
- rectified edge = straight 90 degree cut
- pressed edge = rounded cut
I have seen some people use 12″x24″ tiles cut in half to create the checkered floor look. However, in this case you will need to ensure the original tile has a straight/rectified edge or you will have 3 pressed edges with one straight cut edge after cutting each 12″x24″ tile in half.
Likewise, most 12″x24″ tiles are not exactly 12″x24″. The exact measurements are usually just somewhat close to the advertised size, for instance 11.8″x23.7″. You will end up with a lot of waste from trying to create even sided squares. You will also have to make sure the secondary tile is the exact same size.
With all of that being said, finding two compatible tiles for checkerboard flooring was by far our biggest headache with the bathroom remodel! I was about to give up until I found…
The Perfect Grey and White Tile for Checkered Floors
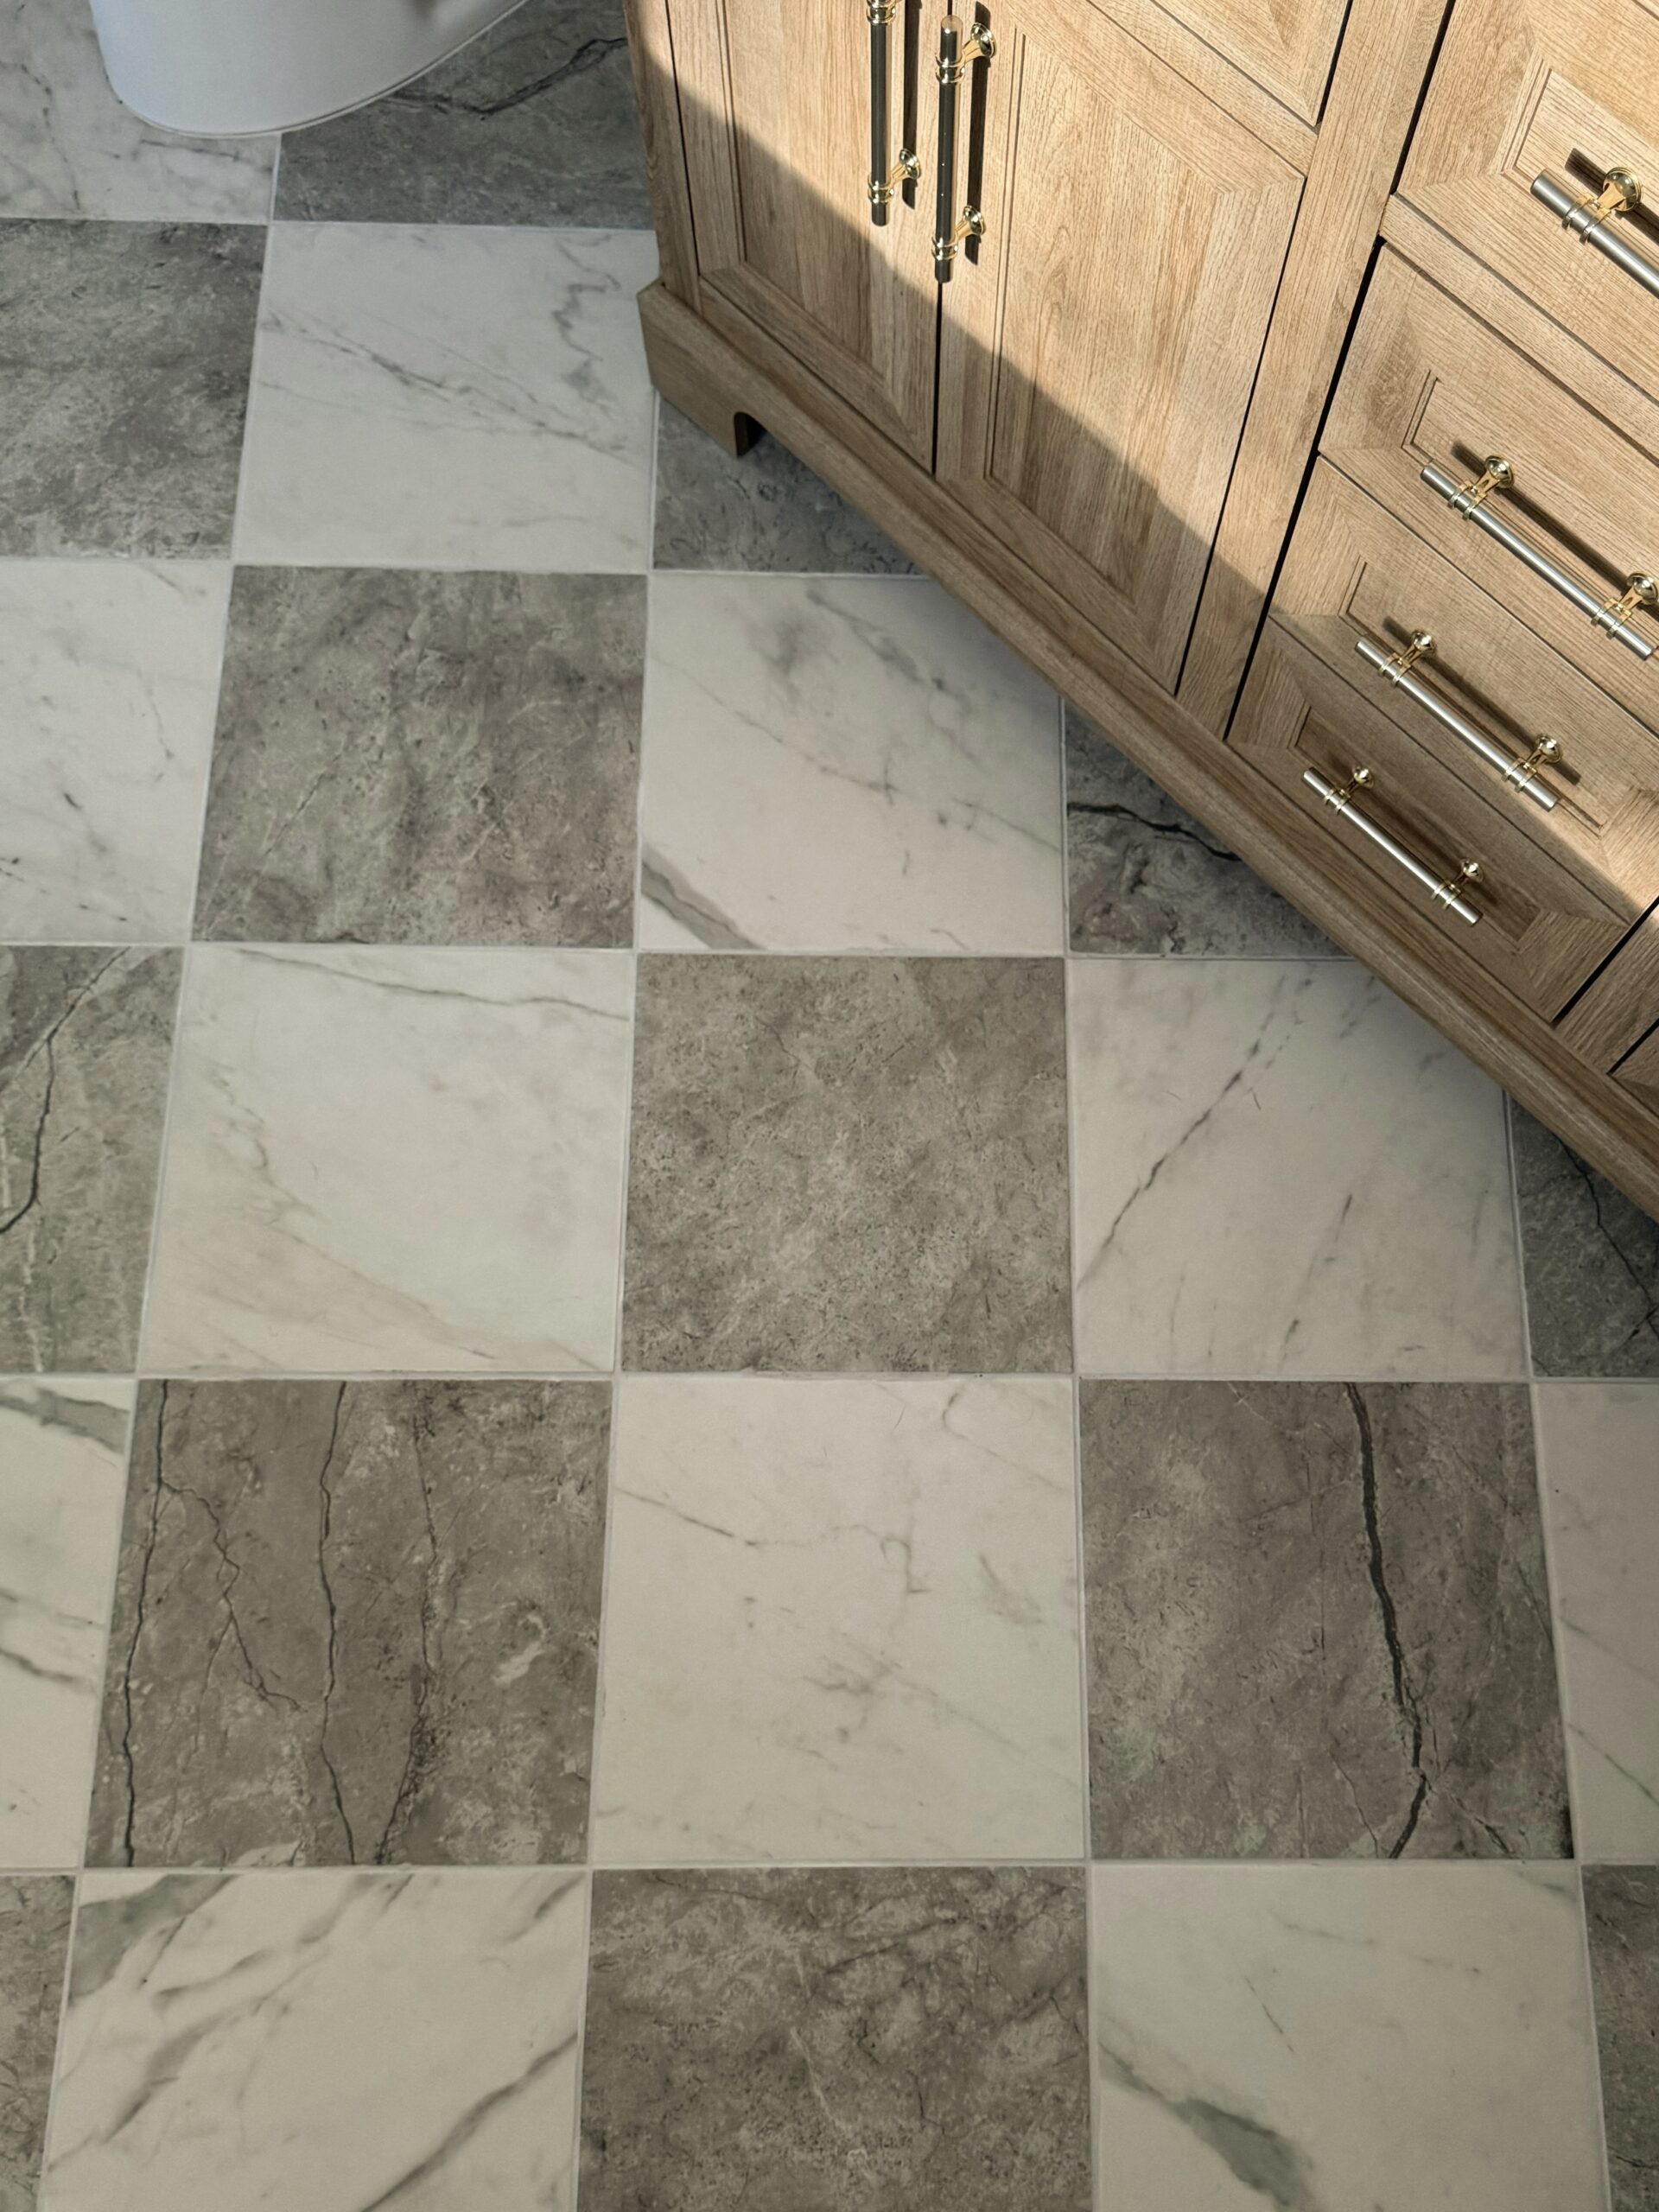
I was just about to give up and settle with a different style of flooring. Then, I stumbled upon these somewhat newly released set of porcelain tiles perfect for creating the checkerboard floor look.
The exact tile comes in a white and grey (both sold separately). After reviewing the exact specifications, both tiles share the same size, thickness, weight, material, finish and edge cut for each tile. Hallelujah! I felt like I found gold.
Bonus, they were already sold as square tiles. No extra cutting or edge smoothing needed!
- Grey Floor Tile (12.99” x 12.99” & 7.5mm thickness)
- White Floor Tile (12.99” x 12.99” & 7.5mm thickness)
To determine the amount of tile needed for the checkerboard look:
- calculate the square footage of the space that would be tiled.
- multiple that total by 10%, add that new total to the original total.
- Divide the final total number equally between the grey and white tile.
- So, 1/2 the amount of tile would be white and the other 1/2 would be grey.
For us: 70 sq. ft x 0.10 = 7 sq. ft —-> 70 sq. ft + 7 sq. ft = 77 sq. ft —-> 77 sq. ft x 0.5 = 38.5 sq. ft
We needed 38.5 sq. ft of grey tile and 38.5 sq. ft of white tile to complete our checkerboard flooring.
Thankfully, the tile website has a calculator that does all the math for you and even shows how many boxes you will need.
We used Lacrete’s grout in “Silver Shadow” for all the tile in our bathroom. It is a neutral light grey shade that doesn’t appear too yellow or blue when paired with white tile. It almost looks like a soft white when paired with our blue shower tile.
Bathroom Remodel – Vanity
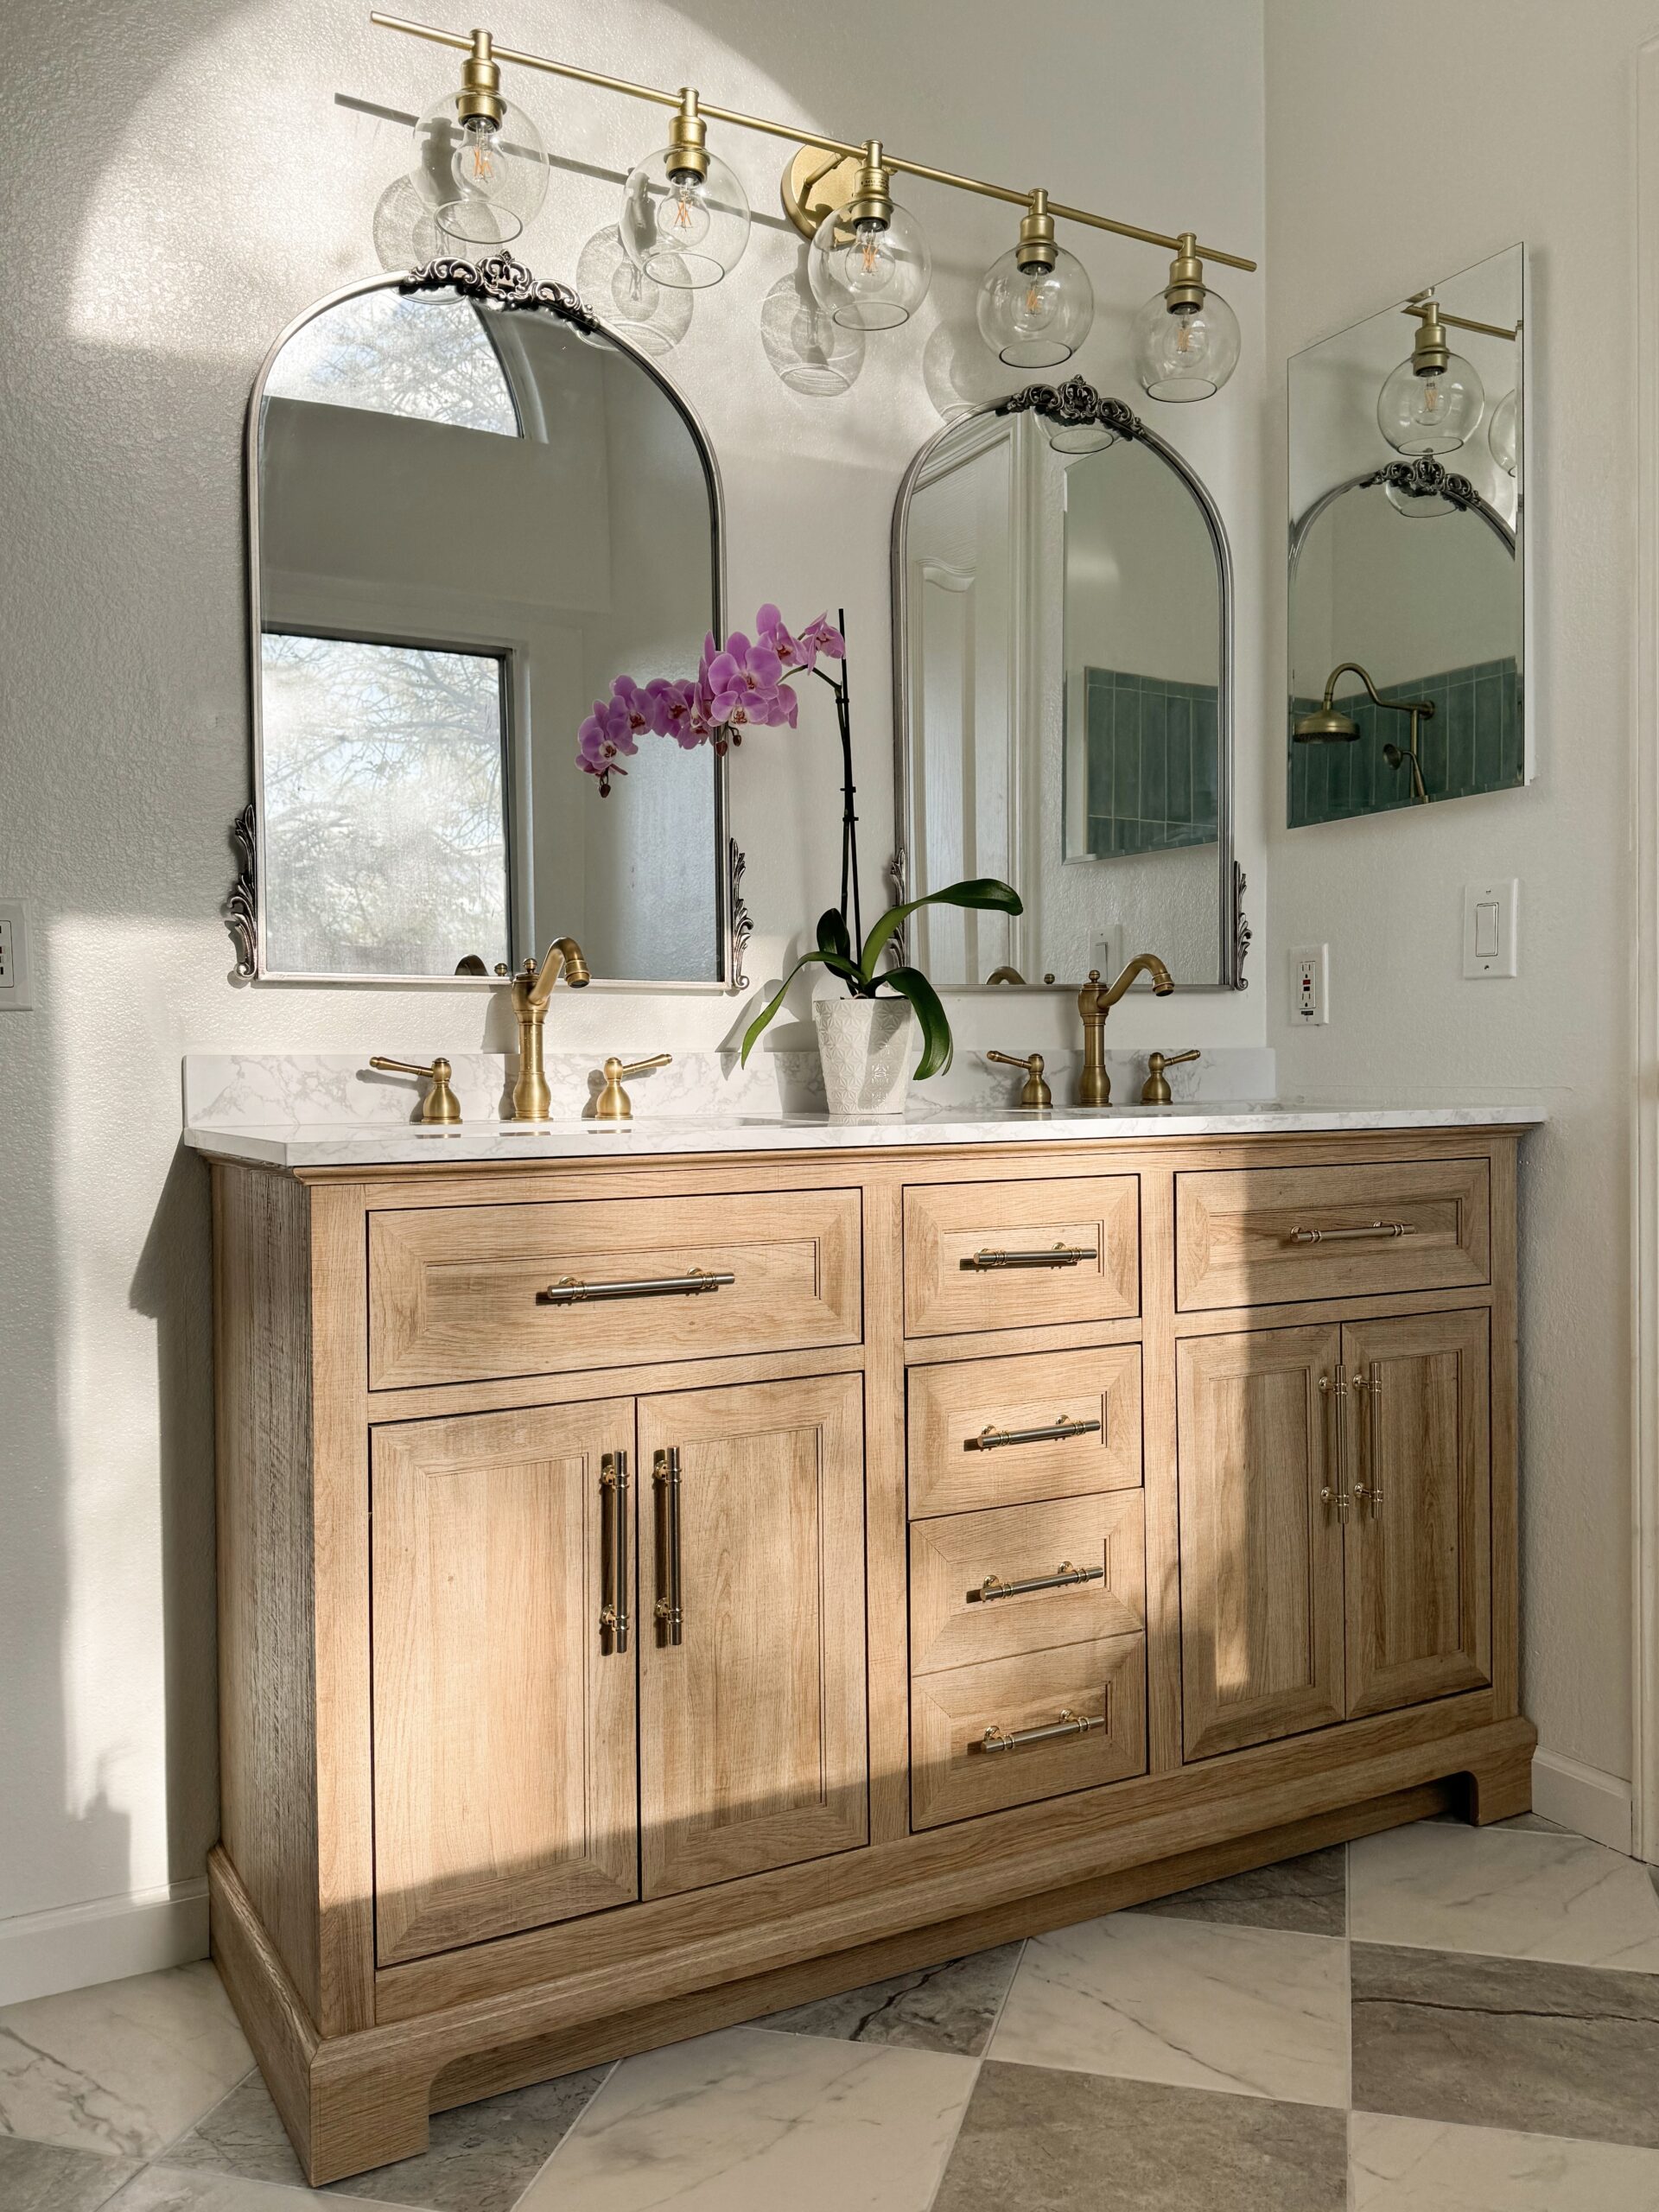
Bathroom Vanity Area Materials:
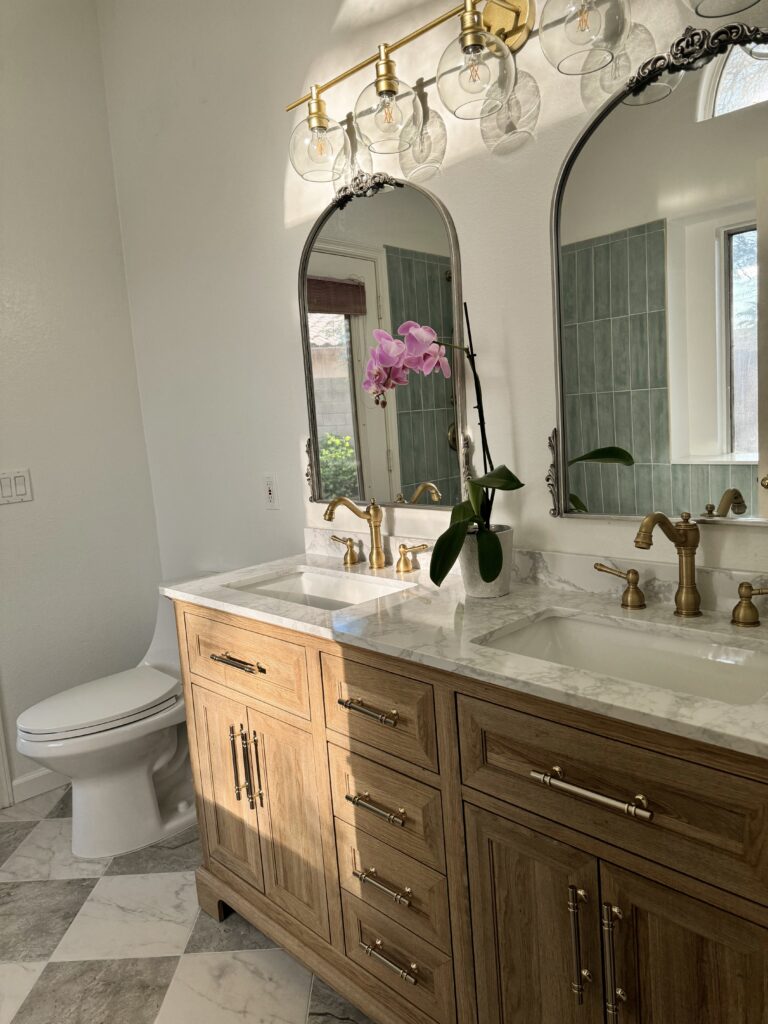
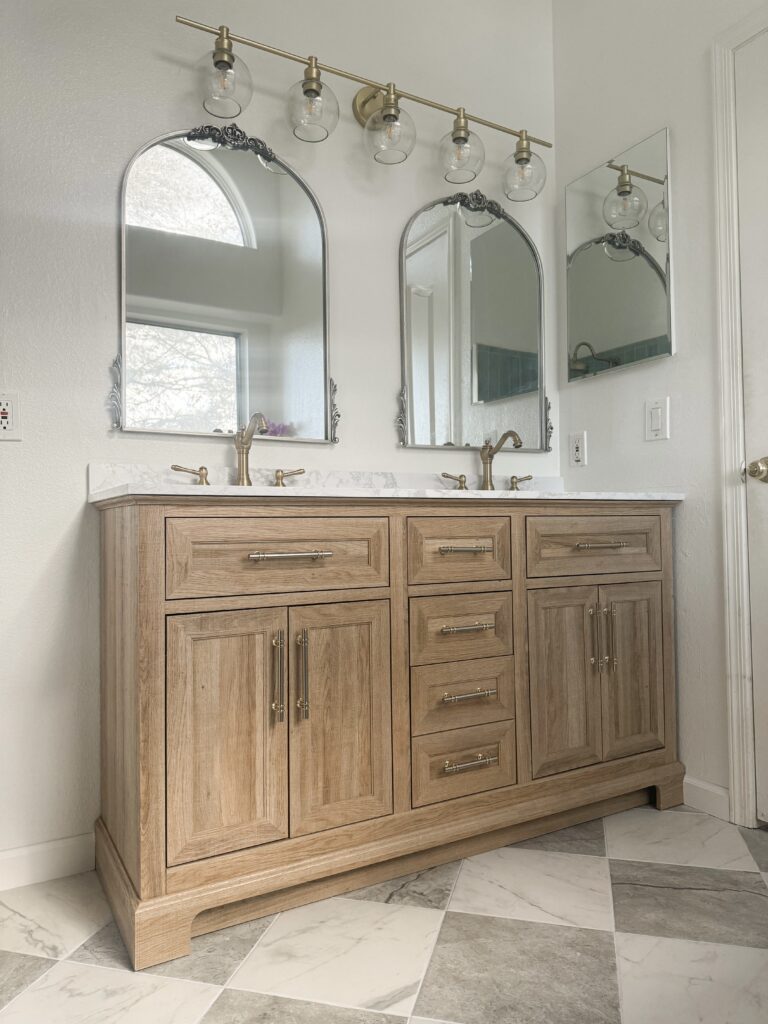
- 60″ Wooden Vanity
- Silver & Gold Cabinet/Drawer Pulls (used 5″ & 3.75″)
- Gold Sink Faucets
- Silver Antique Style Mirrors
- Light Fixture
- Grey Floor Tile (12.99” x 12.99” & 7.5mm thickness)
- White Floor Tile (12.99” x 12.99” & 7.5mm thickness)
Finding an Affordable Bathroom Vanity
We fell in love with the look (and the affordable price) of this 60″ bathroom vanity. This vanity was the perfect size, perfect wood tone and even came with the engineered marble top and sink situation.
I was a little worried about receiving a damaged product after reading some of the reviews, but I am happy to report that this vanity made it safely across the country (east coast to Arizona). No damage at all! It was very well packaged on a wooden crate, with layers upon layers of thick cardboard buffering.
Bathroom Lighting
To cut costs, we chose to not add two separate vanity lights above each mirror.
I’ll admit, I do not love the bathroom vanity light we chose. We already recycled the box it came in, so we are stuck with it for a while.
The light itself is great! I do love how it looks modern, yet classic. I just don’t think it is the best vanity light for the space. I am leaning towards an upward facing traditional vanity light with opaque lamp shades. Kind of like this one.
Bathroom Remodel – Shower & Tub
Shower & Standing Tub Remodel Materials:
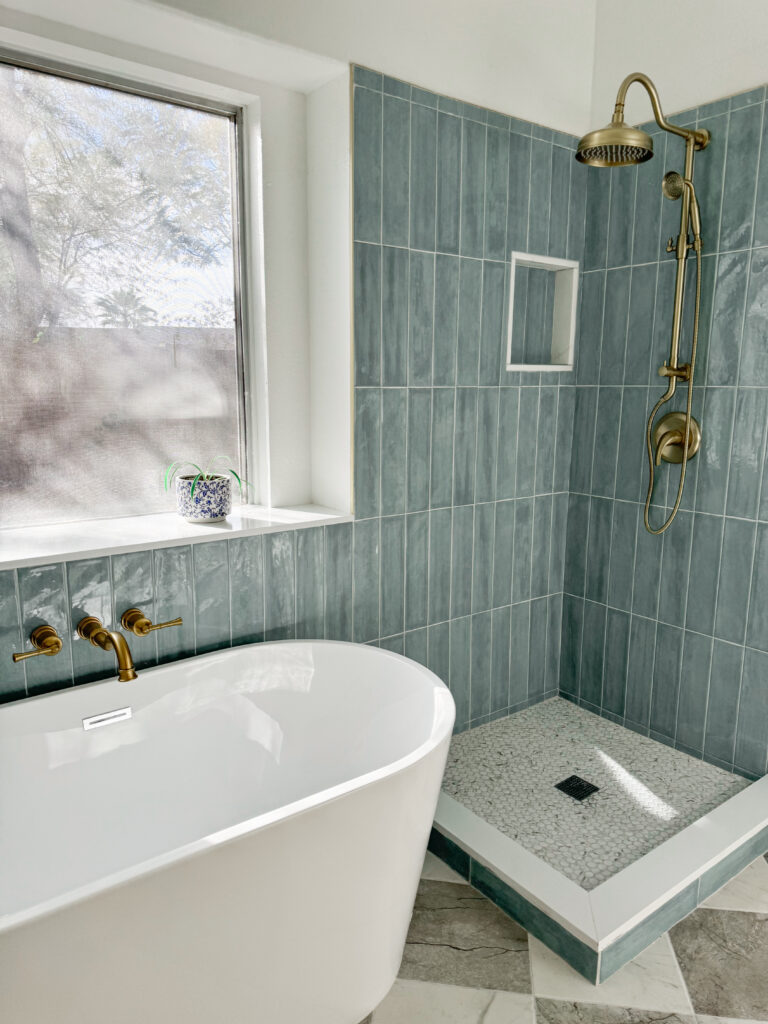
- Blue/Green Shower Tile
- Grey Floor Tile (perfect for checkerboard floors)
- White Floor Tile (perfect for checkerboard floors)
- Shower Floor Tile
- All Grout (color: silver shadow)
- 1/16 Shower Grout Spacers
- 1/8 Floor Grout Spacers
- Gold Shower Faucet
- Gold Shower Temperature Valve
- Gold Bathtub Faucet
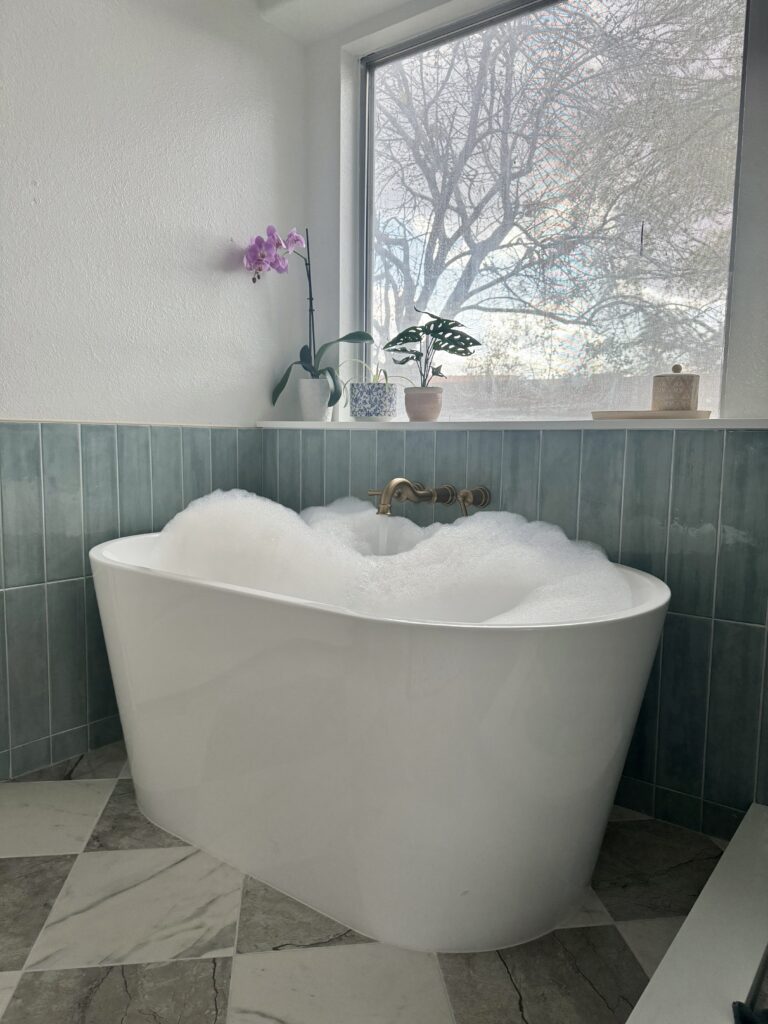
- Standing Tub
Coming up with the simple Bathroom Design
My husband and I met in the middle when it came to the design of the shower and tub construction. He wanted a larger shower, but I still wanted a tub (big bubble bath fan).
As much as I loved the large garden tub, we needed to scale it down to allow for a larger shower space. No complaints though, this standing tub is absolutely dreamy! It also allows for the space to feel more open and the checkerboard flooring to really stand out.
I cannot wait for the glass shower walls to be installed! I will be sure to share photos.
Mixing Hardware Metals in a Bathroom
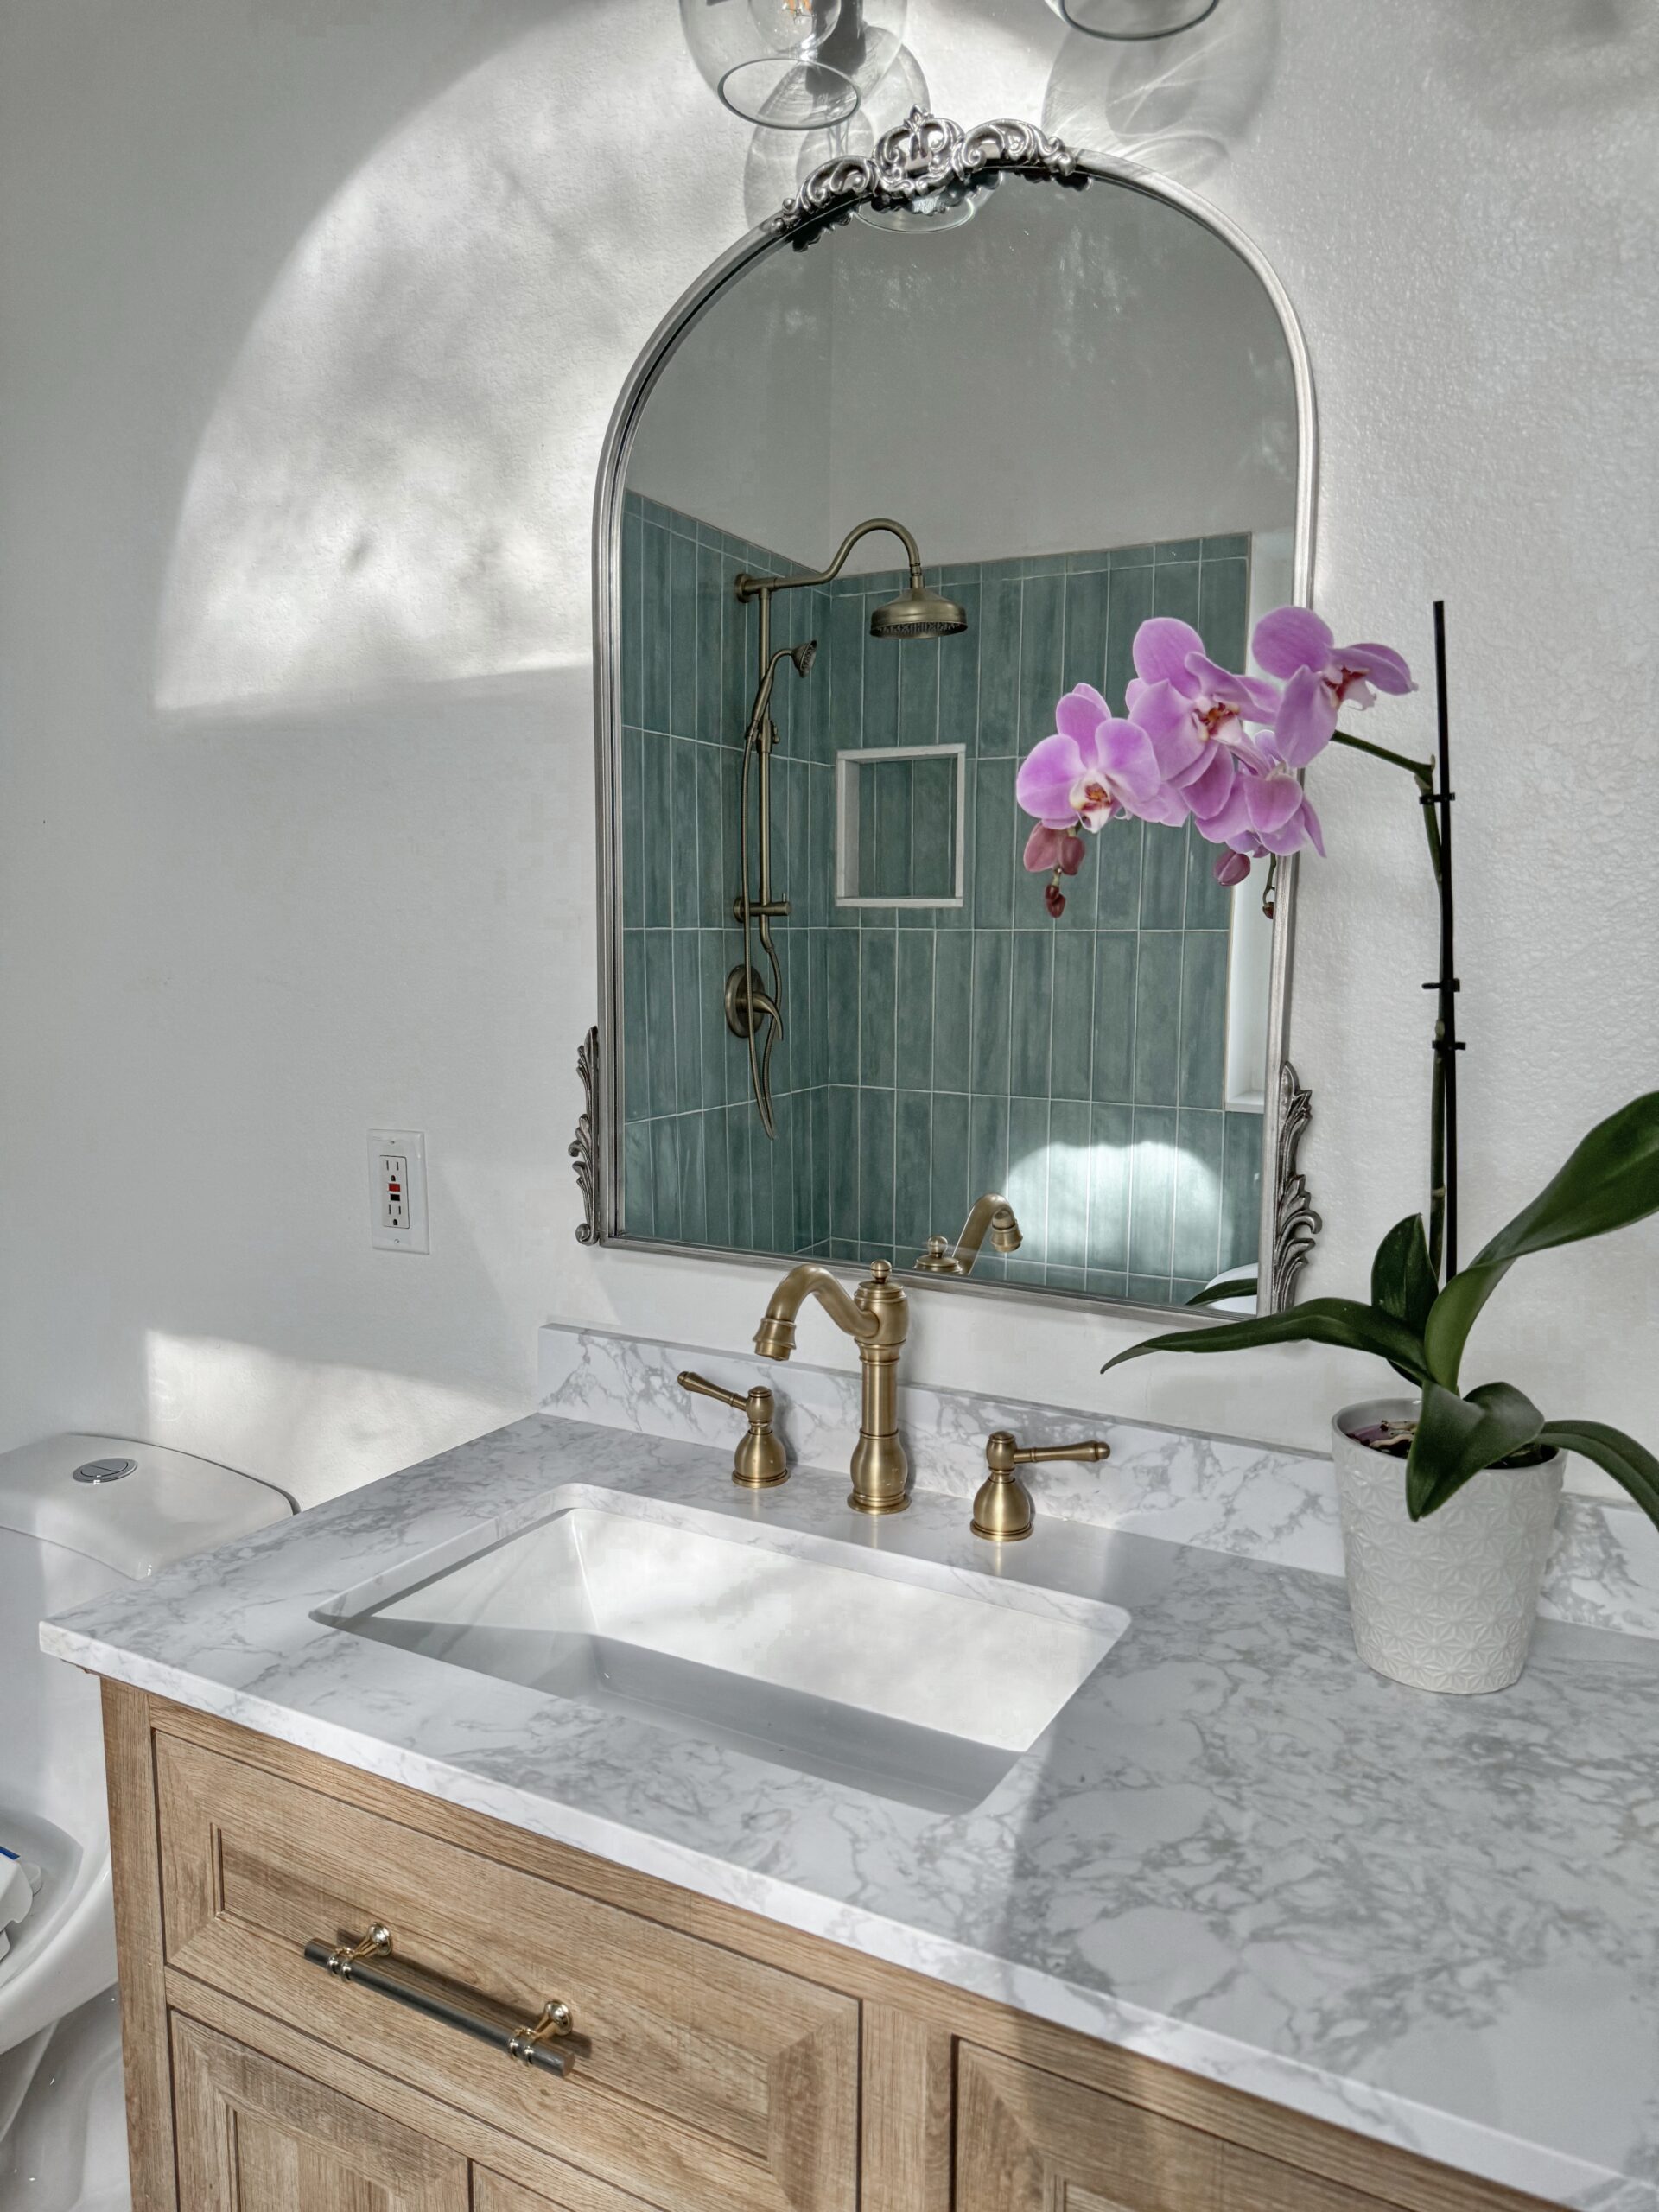
Vanity Area Materials:
- 60″ Wooden Vanity
- Silver & Gold Cabinet/Drawer Pulls (used 5″ & 3.75″)
- Gold Sink Faucets
- Silver Antique Style Mirrors
- Light Fixture
- Toilet
I fell in love with these antique inspired silver mirrors a few years ago and knew they would find their way into our future bathroom remodel.
I originally planned on having all silver hardware, until I compared the blue tile with the gold faucet in our other bathroom. The gold paired with the blue tile ultimately felt warmer and more our style than the silver (which also looked stunning, but in a more classic way).
I didn’t want to return the mirrors, so we opted to try a mixed metal look. I love how it turned out!
Mixing metals can sometimes end up looking so much more balanced and collected than having all fixtures in one metal. Especially considering that gold hardware is so tough to match perfectly.
To tie in the blend of silver and gold, I found these mixed metal hardware cabinet pulls on Amazon.
I used the 5″ hardware for the cabinets and top drawers and the 3.75″ hardware for the center drawers of our primary bathroom vanity (our exact vanity).
Remodeling Company vs. Independent Contractors
We knew beforehand that this project would by far be our most costly. However, I was shocked to see the quotes we were given from various Remodeling Companies (both major and family owned).
Bathroom Remodel Price Quotes from various Remodelling companies
We were given quotes ranging from $20,000 JUST for a new shower and surpassing $40,000 for a complete remodel by various large and local remodelling companies.
Keep in mind, our primary bathroom is barely an 8′ x 8′ space.
Both prices above included the cost of everything (demo, labor, materials). However, we were only able to choose materials from suppliers that they were affiliated with.
These suppliers sold the same warehouse items as Amazon, Wayfair and your average hardware store. However, the items were basically given a fancy name and the prices were inflated.
Even if we were to choose the cheapest items on the inventory list, our locked in remodel price would not change.
Bathroom Remodel Price Quotes from Independent Contractor
We also reached out to an independent, licensed contractor on the Thumbtack app to see how their quotes would compare to the larger remodelling companies.
Through the Thumbtack app (not sponsored, but would be so cool if it was hehe) I was able to find a good list of qualified pros with tons of outstanding reviews and photos of their work.
The first (and final) quote we received for a FULL bathroom remodel was around $12,000 for demo, all labor, plumbing and with all of the hidden construction supplies included (mortar, shower boards, dry wall, pipes, custom shower glass etc.)
We would then order and cover the costs of everything else on our own (the tile, faucets, fixtures, vanity, etc.) This was a little more work on our end (researching, locating and ordering our own materials), but seemed very worth it.
Can you guess which option we chose?!
Professional Remodelling Company Pros & Cons
Pros:
- You get a project manager to oversee everything & make all the phone calls
- You will have instant connections to plumbers, electricians, tile pros, painters
- The job has a faster turnaround time since multiple contractors will be working
- Most of the contractors should be highly professional to upkeep the company’s image
- Payment plans and pay flexibility (you can use a credit card)
Cons:
- Prices are not transparent and incredibly inflated to cover the cost of the project manager’s services
- Materials may be limited to whatever brands/stores the company is affiliated with
- Material costs may be inflated as well (they were in our experience)
- Different contractors almost daily throughout the whole process (gets a little chaotic imo)
Hiring an independent contractor Pros & Cons
Pros:
- The overall price will be MUCH cheaper than using a company
- Prices are very transparent (we knew exactly what we were paying for and why)
- You are paying directly into the pocket of an individual vs. a big company
- So much more flexibility and choice when it comes to materials and design
- The same individuals will be in your home daily. Same routine, they know you have pets, etc.
Cons:
- It can be difficult to find a contractor in your area
- You may need to hire various people for more specialized tasks (plumbing, electricity, etc)
- Turnaround time is much slower since the job is being done by one or a few workers
- Payments may need to be in whole vs. a payment plan (once the job is finished)
Overall Cost to Remodel Our Bathroom
For our entire primary bathroom (approx 8’x8′), it costed us around $15,000 to complete in 2024. Also noting that I live in a big city! This total price included everything: all labor, all of the materials that we ordered ourselves, the custom sized shower glass and even updated shower/tub plumbing.
We opted to paint the walls and ceiling ourselves to save money. We already had the paint from a previous project and it was such an easy task once the space was demoed out.
This price will vary depending on your city, choice of contractor, bathroom size and material choices. However, I hope it gives you a good idea on the thousands you can potentially save by using a professional independent contractor.
The Value of a Bathroom Remodel
According to Zillow, a minor bathroom remodel can add a $1.71 increase in home value for every $1 you spend. For a full remodel in a super outdated space (like ours) we can expect to see around a 72.7% return and sometimes more depending on the current market. Definitely worth it!
However, with no plans on selling anytime soon we really just wanted to treat ourselves to our dream space.
We played around with the idea of DIY-ing everything ourselves. However, after tiling our own kitchen backsplash we quickly learned that our talents (and patience) lie elsewhere.
How we Financed a Bathroom Remodel
We personally did not want to have to take out any loans or acquire any credit card debt. Instead, we ended up saving every last penny that we could for the last four years.
Obviously, easier said than done. I realize just how fortunate we were to be able to save money during the two years we did not have a kid. Even the smallest amount eventually adds up after a few years!
I have also heard of homeowners pulling from equity accounts, home improvement loans and using payment plans to their advantage. All of those are worth looking into if you are hoping to remodel. Bathrooms do place so much on the value of your home, so it’s a worthy expense!
One of my favorite tips for large projects is to use a Rewards Visa to supply your materials. We would then pay everything off in full before the statement period ended. All of the reward points we obtained can now be turned into cash back into our accounts.
All Bathroom Remodel Materials
- Blue/Green Shower Tile
- Grey Floor Tile (perfect for checkerboard floors)
- White Floor Tile (perfect for checkerboard floors)
- Shower Floor Tile
- All Grout (color: silver shadow)
- Gold Shower Faucet
- Gold Shower Temperature Valve
- Gold Bathtub Faucet
- Standing Tub
- 60″ Wooden Vanity
- Silver & Gold Cabinet/Drawer Pulls (used 5″ & 3.75″)
- Gold Sink Faucets
- Silver Antique Style Mirrors
- Light Fixture
- Toilet
Closing Thoughts
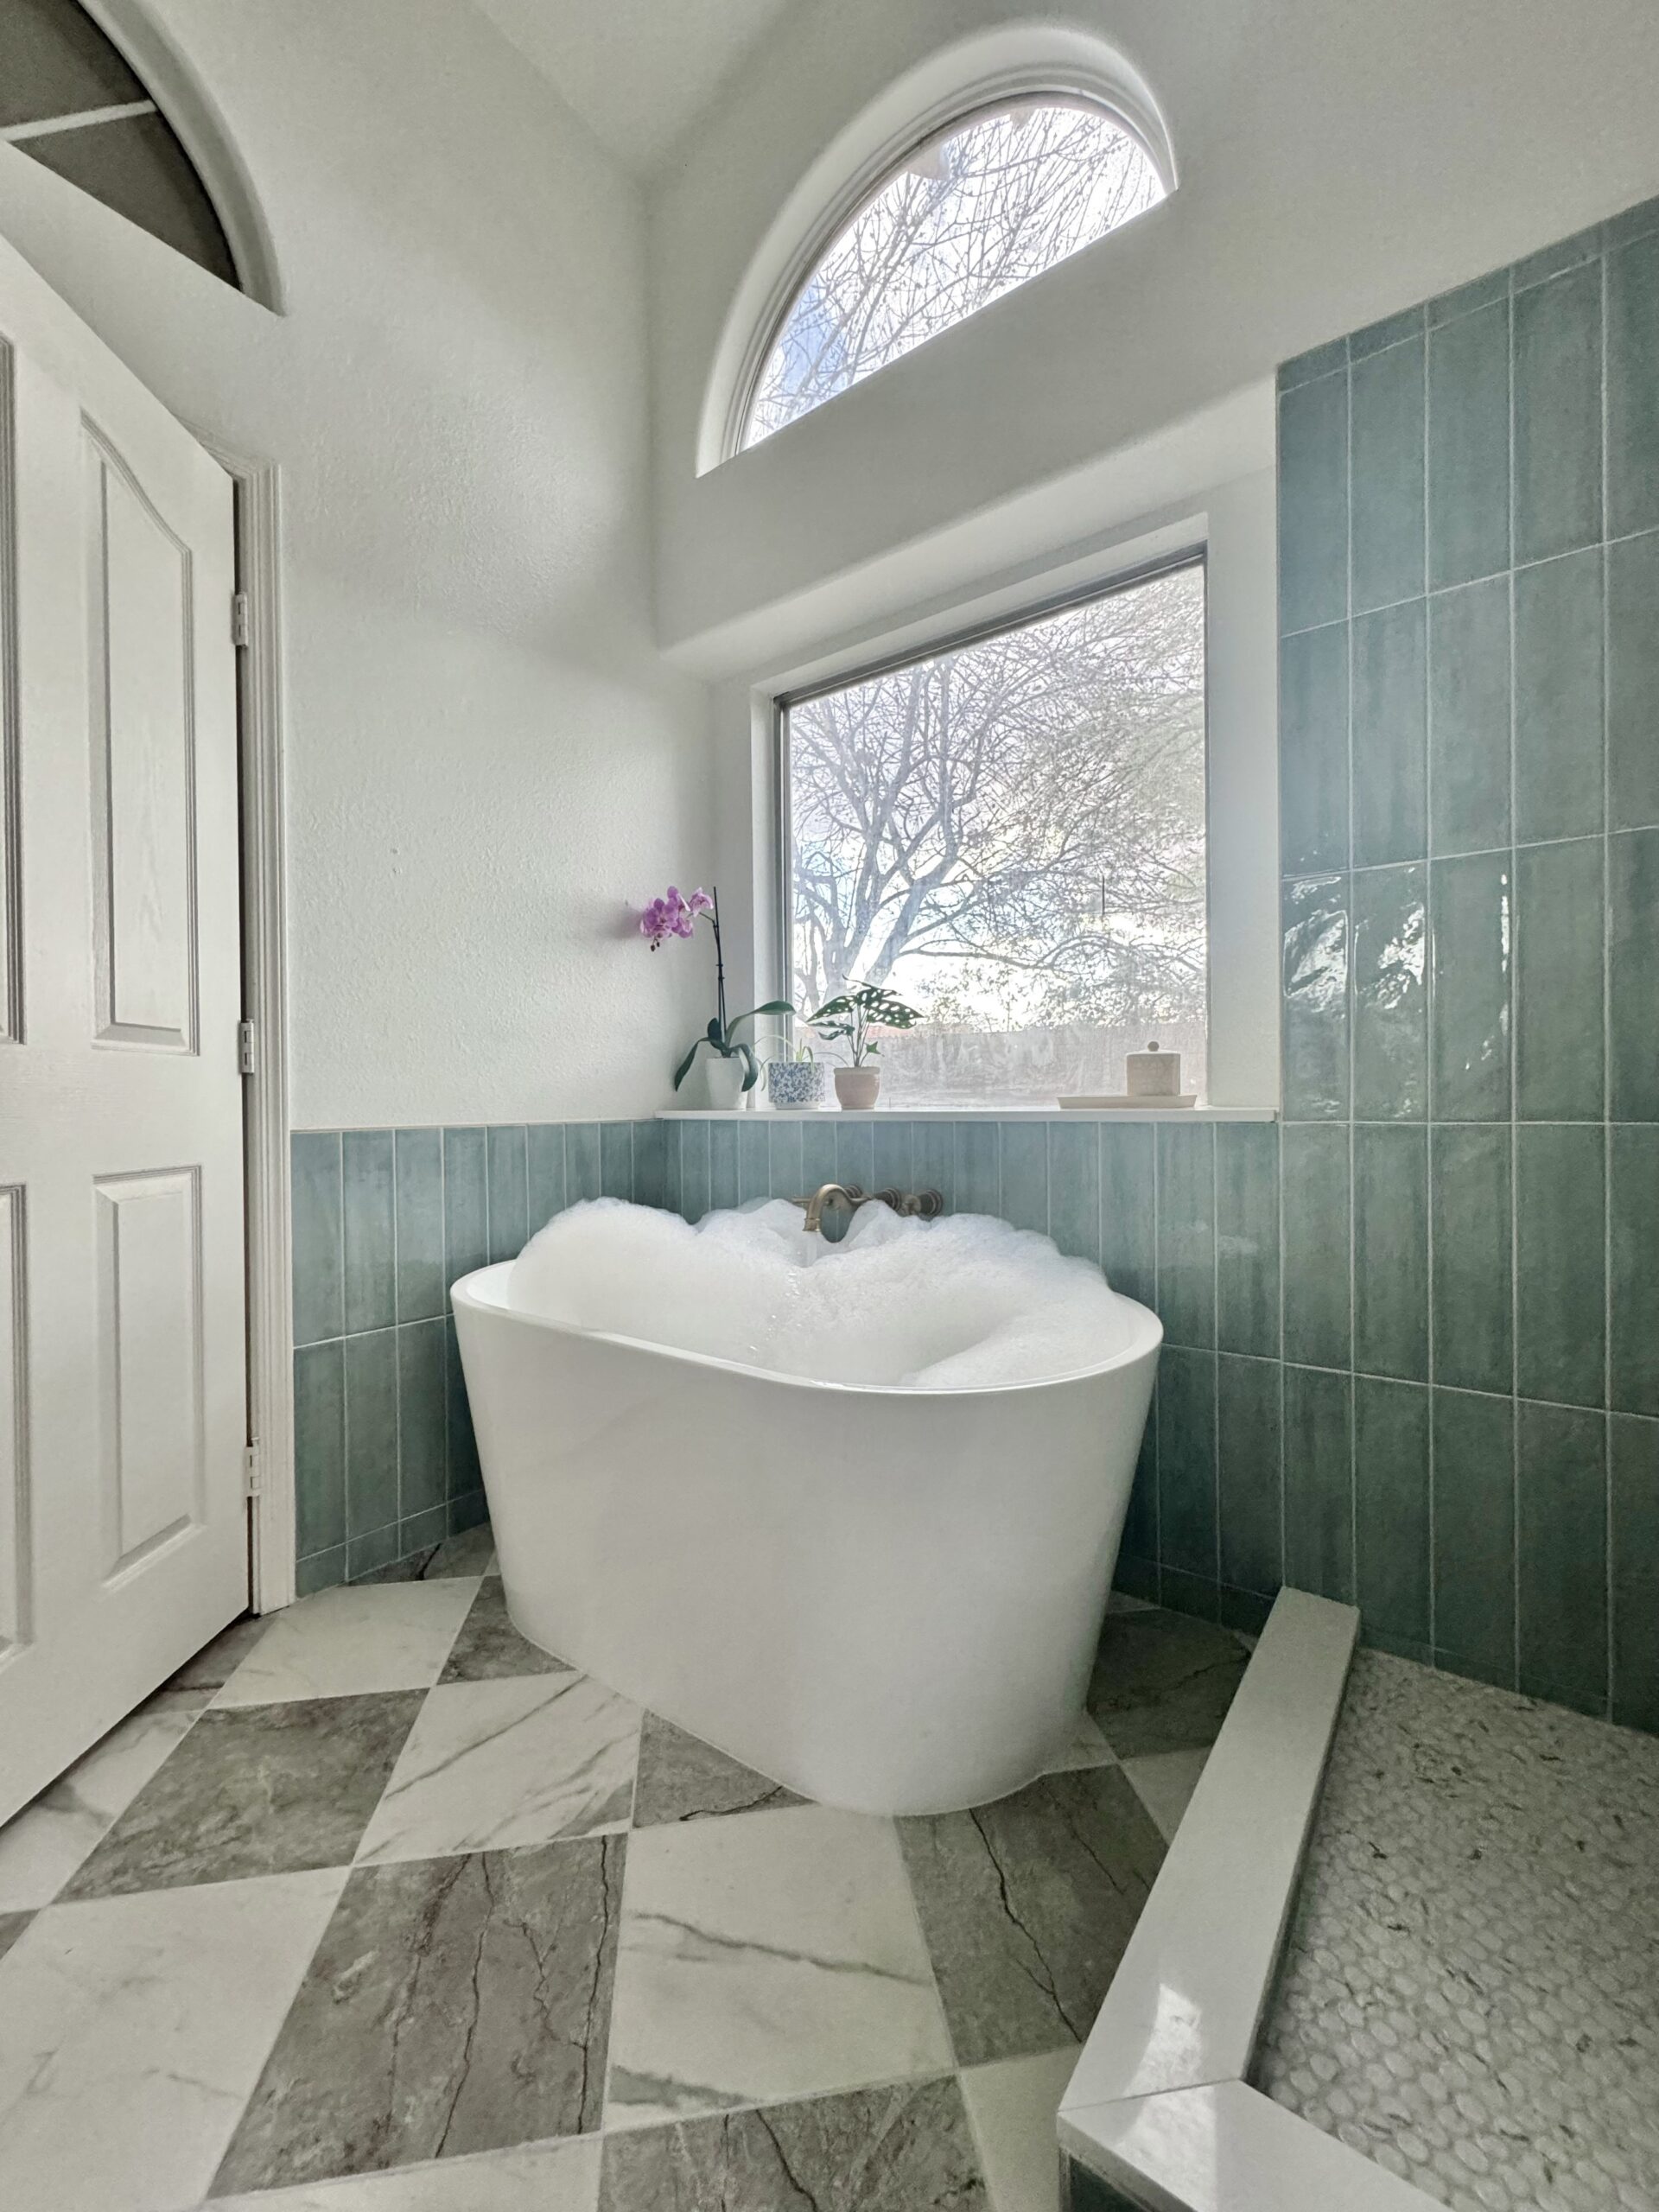
Zero regrets or buyer’s remorse! We are so thrilled with how our primary bathroom turned out. It feels so bright, clean and open now.
I also realize just how lucky we were to find a licensed contractor with over 30 years of experience, professional work ethic, a brilliant portfolio of completed projects and connections to a plumber and shower glass company.
I’d advise anyone to check out the Thumbtack app to find someone that fits your project. There are so many talented workers wanting to do the job they love without the restrictions and having to share earnings with a large company. It never hurts to ask!
Ultimately, we are so incredibly happy with our bathroom remodel experience! Having an updated bathroom has made the simplest tasks so much more enjoyable. I look forward to getting ready, doing my evening skincare routine and even cleaning.
I hope this gives you a little more inspiration, excitement and knowledge of what to expect when remodelling your space 🙂
This post contains affiliate product links. I may earn a small commission off of any clicks and/or sales made at no extra cost to you 🙂 Affiliate links are a brand’s way of thanking creators for using and sharing their products with their audience. This post is not sponsored. All opinions are 100% my own.
Pin it:
I was so excited when I read this! I too had been searching for affordable in stock checkerboard tiles! And when I discovered these ONLY two ones at Lowe’s it was a Hallelujah moment! The right size and right look OMG I was flabbergasted! I too was about to give up. Now I wish I could find an in stock 8” for my smaller pantry in a beautiful tan and white checkerboard sigh. Kindred spirits lol.
Yay!! So happy you didn’t give up and found these tiles haha! I am surprised more companies haven’t released more checkered options since the style is so popular. Best of luck with your pantry tiles!